


Causes of Copper Pipe Corrosion
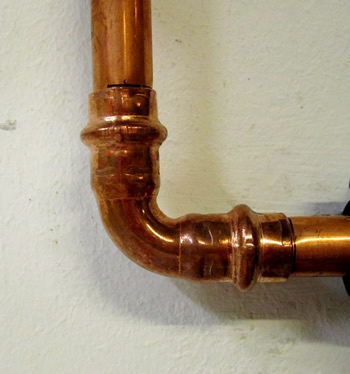
Many homes have copper piping, which is very susceptible to corrosion. This deterioration can cause pipes to fail, leaving homeowners with no choice, but to replace the plumbing. The corrosion is due to physical and chemical reactions between the pipe material and the water.
Here are five common causes of copper pipe corrosion:
1. Extreme pH Levels
If the water has a pH of less than 7 or higher than 8.5, it could cause a reaction and begin to corrode.
2. Improper Installation
If the copper piping wasn’t properly reamed smooth before soldering, there could be burrs inside the pipes. This leads to water turbulence and a type of pipe deterioration called erosion corrosion.
3. Excess Flux Residue
Excess flux from soldering can be carried through the pipe and deposited. This can cause damaging pitting in cold water piping.
4. High Velocity Water
High velocity water can wear away copper from the interior of the pipe through hydraulic wear.
5. Sediment
Sand and other sediments can also cause hydraulic wear on the inside of the pipes.
Corroding copper pipes can be fairly easy to identify if you know what signs to look for. Keep an eye out for blue stains left on sinks, bathtubs, and other fixtures. Lighter-colored clothing or towels can also take on a blue tint when washed if oxidized copper is present in the water.
Copper in drinking water can also be toxic if enough of it is present, so if these signs are noticed, call All Star Plumbing and Restoration right away. We can replace the piping that has become corroded to prevent illness, potential leaks, and ruined fixtures.
Winterizing Vacant Homes

Many people leave the Boise area for warmer weather once winter sets in, leaving behind their houses to take on the cold alone. If not properly winterized, they could come back to broken pipes and water damage. Read on to learn how to prevent damage to a vacant home.
Those who leave for the winter have two choices: Leave their water supply on or turn it off. Here are some tips for both scenarios:
Water Supply Turned Off
When away from home for an extended period, turning the water supply off is a good idea unless the home is protected by a fire sprinkler system. When turning off the water, the pipes need to be drained. Do this by opening the faucets and flushing the toilet to rid them of water. Then pour antifreeze into the toilet tanks and bowls.
Water Supply Left On
If the water supply is going to remain on, the home needs to be heated appropriately. This means keeping the temperature set at 55 degrees or higher to prevent freezing of the pipes. Also, open the cabinet doors in the kitchen and bathroom so the warm air can circulate near the pipes. Shut off the washing machine and dishwasher, however, since they won’t be in use.
Completing these tasks should help prevent frozen, burst pipes while travelers are away, but that isn’t always guaranteed. If you need assistance winterizing or if frozen pipes or water damage is discovered upon returning, All Star Plumbing and Restoration can help. Call us for water damage dry out and pipe replacement services.
Choosing A Bathroom Sink Style
Whether building a new house or remodeling the bathroom in your existing home, there are a lot of style choices to consider. One of those is the style of sink to install. There are so many styles available it can be hard to choose one. This article lays out some of those options and their advantages.
1. Vessel Sink
This is a type of bowl-shaped sink that sits on top of the counter. They sit higher up, which can be an advantage or disadvantage, depending on who will be using the sink. Children might have a harder time reaching the higher sink. This is a very modern, bold style of sink that can elevate any bathroom.
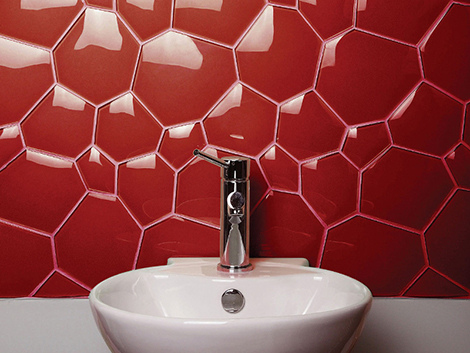
2. Wall-Mounted Sink
This style does not require a vanity base, countertop, or legs, giving the bathroom extra floor space. It’s a great option for smaller bathrooms and can be installed at various heights depending on personal preference. The plumbing might be exposed it there isn’t a shroud to cover it up.
3. Pedestal
Pedestal style sinks take up very little floor space, but don’t provide storage. In bathrooms where storage is needed, this might not be the best choice. However, this can be a good choice if you are going for a vintage-style bathroom.
4. Undermount Sinks
This sink is installed below a solid countertop, allowing for ample counter and storage space. Without a rim, the sink rests completely flush with the countertop, making it easy to clean the counter and sink.
5. Self-Rimming
For those who want to keep their existing countertop, this style is the easiest to adapt. It’s the most commonly found style in bathrooms. The rim creates a small lip around the sink and helps to support the sink’s weight.
No matter what sink style is selected, All Star Plumbing and Restoration can help with the plumbing and installation. Many of these styles will require the plumbing to be moved around a bit if they are being installed during a remodel.
PVC Pipe Skeleton Decoration
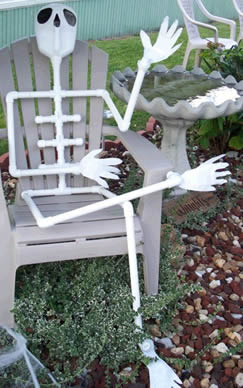
Looking for a last minute, easy Halloween decoration? This one won’t scare any children, but makes for a cute and funny yard addition. Here’s what you’ll need:
- 2 PVC Pipes that are 1 inch wide and 10 feet long
- 4 90-degree elbows
- 4 45-degree elbows
- 4 cross connectors
- 2 T connectors
- PVC cutter or saw
- Gallon size empty white plastic jug
- Scissors
- Putty
- Marker (optional)
Instructions:
- Cut the first 10-foot long pipe into four 20-inch lengths for the skeleton's legs, two 14-inch lengths for the upper arms and two 7-inch lengths for the hips.
- Cut the second 10-foot pipe into two 10-inch lengths for the skeleton's forearms, two 9-inch lengths for the shoulders, one 12-inch piece for the neck and 10 4-inch pieces for the rib cage. You can set aside the extra pipe that will be remaining, you won't need it.
- Attach the leg pieces together by screwing one 20-inch pipe into one side of a 45-degree elbow, then screwing another 20-inch pipe into the other side. Repeat with the remaining two 20-inch pipes and 45-degree elbow.
- Attach the 14-inch long upper arm to the 10-inch forearm by screwing the ends of the pipe into a 45-degree elbow. Repeat with the other 14-inch and 10-inch pieces.
- Attach a 90-degree elbow to the top of each 14-inch piece and to the top of the 20-inch pieces.
- Attach one hip piece to the 90-degree elbow on each leg, then attach a shoulder piece to the 90-degree elbow on each arm.
- Assemble the rib cage by pushing four rib pieces into the openings on a cross connector. Push the top rib piece into the bottom of another cross connector, then place three more rib pieces in the openings. Push another cross connector onto the top rib piece, then attach three more rib pieces. Push another cross connector onto the top rib piece, then slide the shoulder pieces into the openings on each side and the neck piece into the top hole.
- Push the T-connector onto the bottom rib piece, then push the two hip pieces into the sides of the connector. Your skeleton should be assembled now except for the head.
- Cut two holes in the front of the empty jug for the skeleton's eye sockets. Cut a hole for the nose and mouth, too. You can also draw these holes with a black marker. Slide the opening of the jug over the neck piece and fill with the putty to hold in place.
- Set it up just in time for Halloween!
Past Plumbing Newsletters