


Water Pressure Problems

Do you feel like the water pressure is too high or too low in your home? Are you considering buying a new home and want to make sure it has adequate water pressure? There are a few things to look at in each of these situations.
A simple water pressure gauge can be purchased from any local hardware store, using it is the best way to determine what amount of water pressure you’re working with. It’s recommended that homes have between 30-80 psi of pressure. Water pressure that’s too high can put stress on your pipes and fixtures and if it’s too low regular household chores, such as filling a pot with water or getting the shampoo out of your hair, can take forever. If you don’t want to purchase a pressure gauge, simply turn on the shower and sink faucets in the bathroom and then flush the toilet. If you see a significant drop in water flow/pressure in the shower when the toilet is refilling, then you may have a low pressure problem.
A low pressure problem could have a few different causes. Possibly there’s a leak somewhere within your household plumbing or there’s some kind of buildup in the pipes which is reducing the flow of water. In either of these situations its recommended that you contact a plumber to come up with a solution. Neither of these potential problems is typically seen as a DIY job. All Star Plumbing and Restoration has plumbing technicians qualified to deal with either of these problems.
High pressure is usually a result of the municipality you live in. The best option for dealing with it is by installing a pressure regulator on the main water line coming in to your home. This is something you may be able to do on your own but is certainly something the plumbers at All Star Plumbing and Restoration can take care of as well. High pressure is definitely something worth addressing as a pressure regulator can save your plumbing from abuse and save you money on your water bill.
Tips for Replacing the Wax Ring on the Toilet
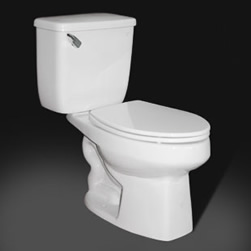
Often the wax ring on a toilet can last up to 30 years, so it may not be something you ever have to deal with, but if at any point you notice your toilet leaking around the base or you must move the toilet for any reason, then it’s time to replace the wax ring. The wax ring is exactly what the name implies, it’s a ring of wax that creates a watertight seal between the toilet and the sewer pipe. Replacing it is an inexpensive and fairly simple job.
Before you get started, turn off the water supply from the wall to the toilet. This is usually done by turning the valve under the toilet. Flush the toilet to get as much water as possible out of the tank and bowl. Remove any remaining water by using a sponge, bucket or wet/dry vac. Next disconnect the water supply line from the bottom of the toilet.
At this point you’re ready to remove the toilet. Under the protective caps you’ll find the bolts at the base of the toilet. Use an adjustable wrench to remove the bolts and washers and then carefully lift the toilet and relocate it to another location. Its recommended that a blanket or towel be placed under the toilet to prevent damage to the floor or water leaking.
Use a putty knife and remove as much of the old wax ring as possible both from the flange (the pipe fitting on the ground where the toilet was mounted to the floor) and from the bottom of the toilet itself. As much as you can, remove any other debris, and smooth and dry the surface of the flange. If you notice any damage to the flange, contact a plumber before moving further with the repair. It’s possible that the flange needs replaced, which is not a DIY job.
Now it’s time to put the new wax ring in place. Review the installation instructions on the packaging for the specific wax ring that you’ve purchased. Some are self-adhesive; others have slight differences but in general adhere the ring to either the top of the flange or the bottom of the toilet. Now position the toilet back in place being careful to line up the holes on the base of the toilet with the two flange bolts. The wax ring should get smashed between the two at this point.
Sit on the toilet to make sure it doesn’t wiggle and is seated flush on the ground. Secure the washer and nuts back in place at the base of the toilet and reconnect the water line. Once you’ve turned the water back on to the toilet, give it a couple of flushes to make sure there aren’t any leaks and you’re good to go!
Although this may seem like a straight forward procedure, many homeowners are not comfortable replacing the wax ring on the toilet. If the seal isn’t properly installed, there is a risk of water damage occurring. Contact the professionals at All Star Plumbing if tackling this job isn’t for you. We’d be happy to take care of it for you.
Replacing or Repairing the Boot on Your Plumbing Vent
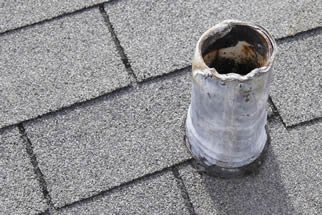
When was the last time you inspected the rubber boot at the base of the plumbing vent on your roof? For most people the answer is either never, or what in the world are you talking about?!
On the roof of your home there’s a pipe that vents sewer gases and prevents you from getting sick. This pipe has a pretty important job, but often gets overlooked in regular home maintenance.
In the area where this pipe goes into the roof there’s a rubber boot which prevents water from leaking in to your home. While it’s reasonable to expect this boot to last a while (upwards of 10-15 years) it’s not going to last forever. When it begins to crack or split apart it’s time for a replacement before you end up with water damage inside your house.
If you’re comfortable being on your roof and have basic experience working with shingles, then this is a pretty simple repair job. First inspect the flashing around the shingles. If it appears to be in good shape, then there’s no need to replace it and you can move to just replacing the boot. Should you find that the flashing needs replaced you’ll need to carefully remove any shingles that hold the flashing in place, as long as you don’t damage them during removal they can simply be nailed back down afterwards. Use a knife to free the damaged boot from the caulk, pull out the nails holding the flashing on and replace with new flashing which should be nailed in place.
To install the new boot, take the new rubber seal, some heavy scissors, and silicone adhesive up on the roof with you. Cut the rubber seal to fit the size of the pipe with your scissors and slide it over the old seal (if still in place). Make sure it fits well and looks good before applying the silicone adhesive either on top of the old seal or directly to the flashing if the old seal has been removed. Apply the adhesive liberally to ensure it properly seals the new boot in place.
Another option if you’re uncomfortable removing shingles is to purchase a product called a Perma-Boot®. It’s more expensive but this unit slides right over the existing boot and flashing and in seconds is installed. It also comes with a lifetime warranty. Considering that this “more expensive” product still comes in under $20 it certainly seems worth the money to eliminate the concern of water leaking in at a future point in time.
Decorating Ideas for Around the Bathtub
In many master bedrooms the bathtub area is a great opportunity to add some décor and reflect your personal style. For many homeowners though the large amount of space around a garden tub is difficult to fill. It can be tricky to figure out what to put in that space to give it some personality but keep it serene. Here are a few suggestions to get you started.
Colors – keep the colors neutral (brown, white, beige) think of the last time you visited a spa, likely you didn’t see a lot of dominate, vivid colors. The color scheme will set the mood for relaxation, which is definitely the hope for time spent in the bathtub.
Plants – add a bit of greenery to the area. Some small foliage plants can be a great way to make it feel as though you’ve brought a bit of the outside in. Plants can create that feeling of garden tranquility.
Height – look for something to add to the space that gives it some height. This could be a candle on a pedestal, a tall plant (real or artificial), a vase, or a towel display. Consider repurposing a wine rack to hold rolled up towels.
Bath Items – setting things around the tub that would be used during a relaxing bath can be both practical and beautiful. If you can find things such as lotion and bubble bath already packaged nicely just set them out, otherwise some simple glass jars can be filled with Epson salt, bath beads, or other bath items and then used as part of the décor.
Scents – consider adding something that will give the room a pleasant scent such as candles, essential oils, a bowl of potpourri, or a diffuser. The mood can be set with a good scent and some calming lighting.
Sprucing up the master bathroom can be an easy, inexpensive way to lift your spirits and create your personal oasis to escape the hectic pace life often brings.
Past Plumbing Newsletters